Sunday, 11 December 2011

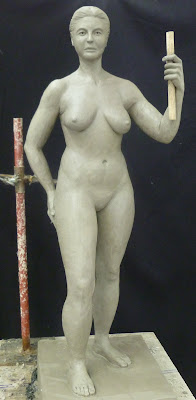
final half life sculpture


There's a lot of room for improvement but I've learnt so much from this project. Looking forward to up-ing it with the next project.

Tuesday, 29 November 2011

Tuesday, 22 November 2011

Wednesday, 9 November 2011

Refining life sculpt


Refining the shapes now and observing the model very closely. Made the head too short origionally. Ive been struggling with the arms but they are coming on. Trying to understand the muscles and how the arm sits in the joint. Still got the feet and hands to start.

Monday, 17 October 2011

shapely legs


Scultping is going well. Recieved plenty of constructive critisism today. I need to work on the collar bone and shoulder, get back the bone structure. Im finding the collar bone the hardest part because its delicate, I feel more comfortable dealing with the larger shapes. Im pleased with the shapely legs. The arms, Ive just started but I need to know how the bones work underneath the flesh to sculpt them convincingly. Looking at arm anatomy tonight. Need to take some off the waist/back as the model is a more hourglass shape. Good progress though, lots to improve on. Also smoothing clay over with rubber kidneys is so satisfying.


Thursday, 13 October 2011

LIFE sculpting


cut back on thighs and chest according to re-measuring the model. Scuplting the human figure is new to me, measuring is key but my tutor tells me so is trusting your eye. Its about knowing where the bones are under the skin first. We've done about three sessions, Im really enjoying the challenge, more to come.


marked shoulder blades, back dimples and top of spine by measuring these points off model.


trying to build up chest and carves.


marked knees, hip bones, collar bones, widest hip point and centre of collar bones (the pit) with screws.


made a clay bed of 5cm and began building shapes on body with rolls of clay, constantly measuring widths, heights and depths.


first marked the centre of collar bone (the pit) on clay. did this by measuring the distance from the ground to the pit of the model and halving this, leaving 5cm below to build clay bed.


This term we are to learn how to sculpt the human figure from life, scaling down by half, so half human size. First I made an armature out of aluminium wire and jubille clips. The wire for the arms is twisted using a drill to provide grip for the clay. On the legs I have wrapped thin wire around them for grip. The armature has been made with the models measurements in mind. The legs are longer because there will be a clay bed at the bottom. The armature is then connected onto a back iron which is drilled onto our tables. We are sculpting a female.


Sunday, 5 June 2011

Figure Drawing Project

Because next year we are sculpting the figure from life we are warming up by drawing statues in musuems. Here at the V&A. The hand on the chest is missing, will go back to finish.

Sunday, 22 May 2011


On work experience at the moment. Creating puppets for a production called Captain Stirrick. The lead character is haunted by 4 other characters in the form of giant puppet heads in the style of 'Punch and Judy' (Punch being one of the characters). I am making the Judge puppet. I have use paper mache, mod roc and fabric. Modelled by Mr Robertson.


Monday, 28 March 2011

Friday, 25 March 2011


Paint job in progress. HAve glued helmet inside now so its wearable. Lots of dry brushing to do and a tail to make.

Wednesday, 23 March 2011


Covered foam Rhino in stretch fabric and latex. Tried to make wrinkles see above. Next Spray Paint.

Saturday, 19 March 2011

Pauline on youtube


Above is a link to the female Rhino in action. (video on youtube)
We have attatched a neck and are ready to fabricate the whole thing with fabric and latex. We have added bumps sculpted out of foam to begin creating the texture the Indian Rhino has.

Wednesday, 16 March 2011

HORNY


Here we have sculpted the horns out of polyfoam and sanded them. Will blend them into the black plastazote with polyfilla, sand it all into one form and then paint. Below shows the ears FINALLY moving, the ears simply pivot on a stick, pulled by string and are pulled back by a spring attatched.


Sunday, 13 March 2011

Rhino BOD

1
2
3
4
5
AHH the Rhino form in plastazote is complete. Meet Clive and Pauline the happy Rhino couple. Above (5) shows back of head, rod attatched inside for the puppeteer to control. Back of body (4). Front (3), my face is ruining this at the moment but the window cut will be covered in mesh and made far more subtle with the finishing. (2) is my Rhino, female (left) and my partners (right) (male). We need to work on the males head, for some reason its gone all 'gaunt'. and (1) is the side view which I am really pleased with, half a Rhino looks alright I think. Having problems getting the ears to move, friction and access as the puppeteer cant reach the ears. The feet are having slits put in and winkles to create joints and easier movement. A cane frame needs to be made for the puppeteer to wear and that will carry the body above their head. The whole Rhino will be covered in fabric will wrinkles added and polystyrene balls underneath in places to create a texture. We have 3 more weeks.


Tuesday, 8 March 2011

Rhino Body and smoking nostrels

Wired up a shower gel bottle full of talcom powder. Chuffed with this.